"Maximizing Sales and Customer Satisfaction with Salesforce's Customer Setting Feature: A Step-by-Step Guide"
.webp) |
| Custom settings in Salesforce |
Custom settings in Salesforce are similar to custom objects and enable developers to create custom sets of data, as well as create and associate custom data for an organization, profile or specific user. Custom settings can be used in formulas, validation rules, Apex code and the Web Services API.
There are two types of custom settings in Salesforce: List Custom Settings and Hierarchy Custom Settings.
List Custom Settings are a type of custom setting that provides a reusable set of static data that can be accessed across your organization. This type of custom setting is similar to a custom object with custom fields and can be used to store data that users can access via formula fields, validation rules or Apex code.
Hierarchy Custom Settings are another type of custom setting that uses a built-in hierarchical logic for “personalizing” settings for specific profiles or users. This type of custom setting allows you to “set” default values at the organization level and then override those values for specific profiles or users.
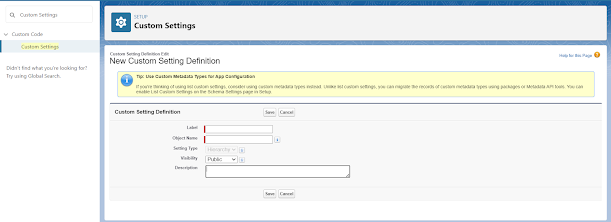
To create a new custom setting in Salesforce:
- Navigate to Setup and search for “Custom Settings” in the Quick Find box.
- Click on the “New” button.
- Select either “List” or “Hierarchy” as the Setting Type.
- Enter a label and name for your new custom setting.
- Click on the “Save” button.
Once you have created your new custom setting, you can add fields to it just like you would with any other object in Salesforce. You can also use these fields in formulas, validation rules or Apex code.
In conclusion, custom settings provide developers with an easy way to store and access reusable sets of data within their Salesforce organization. With two types of custom settings available – List Custom Settings and Hierarchy Custom Settings – developers have flexibility when it comes to personalizing their applications for different users or profiles within their organization.
Steps to Create List Custom Settings
List Custom Settings are a type of custom setting that provides a reusable set of static data that can be accessed across your organization. This type of custom setting is similar to a custom object with custom fields and can be used to store data that users can access via formula fields, validation rules or Apex code.
For example, let’s say you have a list of shipping carriers and their corresponding shipping codes. You could create a List Custom Setting to store this data and then use it in your Apex code or formula fields to automatically populate the shipping carrier code based on the selected carrier.
To create a new List Custom Setting:
- Navigate to Setup and search for “Custom Settings” in the Quick Find box.
- Click on the “New” button.
- Select “List” as the Setting Type.
- Enter a label and name for your new custom setting.
- Click on the “Save” button.
Once you have created your new List Custom Setting, you can add fields to it just like you would with any other object in Salesforce. You can also use these fields in formulas, validation rules or Apex code.
Steps to Create Hierarchy Custom Settings
Hierarchy Custom Settings are another type of custom setting that uses a built-in hierarchical logic for “personalizing” settings for specific profiles or users. This type of custom setting allows you to “set” default values at the organization level and then override those values for specific profiles or users.
For example, let’s say you have a custom setting that stores the default number of days before an opportunity is considered “stale”. You could set the default value at the organization level to 30 days. However, for certain profiles or users, you may want to override this value and set it to a different number of days.
To create a new Hierarchy Custom Setting:
- Navigate to Setup and search for “Custom Settings” in the Quick Find box.
- Click on the “New” button.
- Select “Hierarchy” as the Setting Type.
- Enter a label and name for your new custom setting.
- Click on the “Save” button.
Once you have created your new Hierarchy Custom Setting, you can add fields to it just like you would with any other object in Salesforce. You can also use these fields in formulas, validation rules or Apex code.
After Adding Fields to Custom Setting
Once you have added fields to your custom setting (either List or Hierarchy), you can use them in formula fields. Here’s how:
- Navigate to the object where you want to create a new formula field (e.g., Opportunity).
- In the “Fields & Relationships” section, click on the “New” button.
- Select “Formula” as the Data Type and click on the “Next” button.
- Enter a label and name for your new formula field.
- Select the type of formula result (e.g., Text, Number, Date).
- In the formula editor, you can reference fields from your custom setting using the following syntax: $Setup.CustomSettingName__c.CustomFieldName__c
- Click on the “Check Syntax” button to make sure your formula is valid.
- Click on the “Next” button and follow the prompts to configure any additional field settings.
- Click on the “Save” button.
Once you have created your new formula field that references fields from your custom setting, it will automatically update whenever those custom setting values change.


.png)

.webp)
Comments
Post a Comment